
With StyleGAN2, a deep neural network architecture from Nvidia Research Labs, we can generate multiple faces. Basically, the network was trained with patterns that represent human faces, and because of that, it’s trained to generate only those images.
This is part of the GAN (Generative Adversarial Networks) family of neural networks, which has two important elements: generator (G) and discriminator (D).
The generator is the guy that is looking to produce some fake content, based on the data he is trained to see, while the discriminator is instead the controller, the one that tries to recognize if the generated content is good or not.
So these two networks compete (adversarially) with each other to generate high-quality fake content that, at some point, is unrecognizable as fake or not.
Let’s make an example: G is a forger that produces counterfeit money, D is an expert of the state mint that can detect if the money is good or not. So when is the work made by G considered good? When D cannot really recognize if it’s fake or not.
Iteration 1: G makes a mild quality banknote. D: this banknote is not legit (accuracy 90%) D won
Iteration 2: G makes a better banknote, but with some noticeable defects to a trained eye D: looks legit but I have some doubts about it (accuracy 70%) D won, but not so easily
Iteration n: G makes a nearly perfect banknote D: I don’t know, it can be real or counterfeited (accuracy 50%) G: banknote is considered good
GENERATOR
Now we’ve seen that the generator is the one that generates fake images, right? But how? We have two main components:
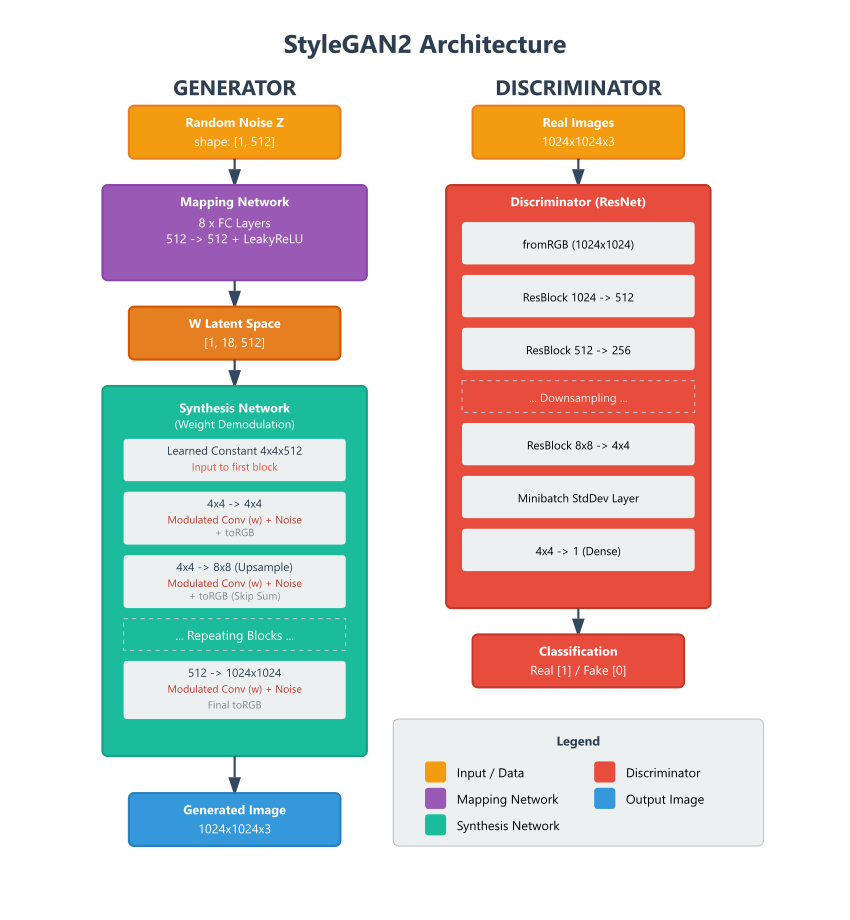
- Mapping network: this is the first part of the network. It starts with the input array called Z, a latent space that is indeed an abstract data vector, made of random noise that the model reads as face traits, so with an input array of 512 entangled elements every value can be the encoding of gender, age, beard, glasses, skin color and so on. We want a random face, so these are completely random numbers.
The real mapping network consists of 8 fully connected LeakyReLU layers, which are a special version of ReLU that won’t return zeros if the input is negative; it simply returns a very small negative value that permits the network to simply consider that value without completely ignoring it. From this mapping network we must generate an output, that is called W, with 18 style vectors of 512 elements each, that are the results of all the LeakyReLU operations of feature isolation. So we can have a matrix with face characteristics divided by rows. - Synthesis network: The W vector is the input of the synthesis network, which is made of multiple convolutional layers that are defined to produce the final image that will “compete” with the discriminator. This network generates the image starting from a [512,4,4] learned constant vector, that is a weighted constant generated when the model was trained to help the model in order to start not from a random value vector but from an optimal value that can make the synthesis network more efficient. The W style vectors are applied in every layer to the image, in order to generate an image that can have the desired characteristics (e.g. male face with beard and glasses). The output is a [3, 1024, 1024] vector that has the three RGB levels with 1024×1024 resolution. So there are multiple operations that are done on the newly generated image at each step, starting from the [512,4,4] vector, to upsample the image at each step (4×4 → 8×8 → etc) by doubling the resolution while adding details by convolution and applying style using modulated convolution: this particular convolution function adjusts the weights’ values according to the style brought from vector W. It is quite similar to changing the correct color of the painting brush, by tuning its nuances, before drawing and painting on the canvas.
Ok now we have the fake image, but that’s probably not the right one. In front of us we have the discriminator, that bad guy that will censor our image if he can recognize a fake image.
DISCRIMINATOR
The Discriminator acts as the judge, analyzing the generated images. Why images and not image? Well this process is not done just after an image is generated, it’s instead started when a number (batch) of images are ready: this process will be performed in parallel with all other images of the batch.
To do this, it employs a Residual Network (ResNet) architecture, that allows the model to progressively downsample the image from its source size of 1024×1024 down to 4×4 while preserving the essential signal flow, through multiple layers called ResBlocks. Let’s look at the final block, the ResBlock 8×8 to 4×4. This layer performs two parallel actions:
- Feature Extraction: It applies convolutions to analyze the 8×8 image and extract features, reducing them to 4×4.
- Skip Connection: Simultaneously, it takes the original 8×8 input and simply shrinks it to a 4×4 “stamp” without altering the data.
Finally, it sums these two results together. This means we are not just looking at abstract features, but we are combining the learned features with the structural context of the original input. So, even when we scale down to a mere 4×4 resolution, we don’t lose the data of the original image.
Now before the output there is an important operation that need to be done: check the 4×4 image with the minibatch Standard Deviation (StdDev) layer, that computes statistics against the current batch of generated images. If the generator produces similar or identical images, the calculated standard deviation drops to zero. This mathematical value acts as a red flag, effectively revealing them as “copies” to the network.
Last but not least, the fully connected layer steps in as the final judge. It analyzes the image features combined with that StdDev “flag”. If it sees high realism but zero variation (the “copy” signal), it classifies the batch as fake, creating a gradient penalty that forces the generator to learn how to create diverse, unique images next time.
HACKING THE STYLE VECTOR
And now the big question: can we control the image generation and apply a specific feature to a target image, acting like an editor? Or maybe use this model to generate images polarized towards a characteristic we need?
Hell yes! Or better… sort of.
We can take a reference image, extract the part of the style vector that encodes specific features, and inject it into W before the synthesis network.
Manipulating the specific layers that define the features we want allows us to generate faces with the desired traits.
Let’s try to generate faces that wear glasses. Instead of copying specific glasses from a ‘donor’ image (Style Mixing), we will take our target image and inject a latent direction—a vector representing the general concept of ‘glasses’—into the structural layers [2, 3].
The key is targeting the correct layers. Since glasses are a physical object modifying the face’s shape, we need to inject this change into the structural layers, specifically the Coarse/Middle layers [2, 3]. Here is a code excerpt to inject the vector into layers 2 and 3:
import torch
import numpy as np
import PIL.Image

def generate_with_injection(G, seed, direction, strength=1.0, layers=[2, 3]):
    # 1. Mapping: Z -> W
    z = torch.from_numpy(np.random.RandomState(seed).randn(1, G.z_dim)).to(device)
    w = G.mapping(z, None)

    # 2. Injection into latent space W
    w_modified = w.clone()
    if not isinstance(direction, torch.Tensor):
        direction = torch.tensor(direction).to(device)

    for idx in layers:
        w_modified[:, idx, :] += (direction * strength)

    # 3. Synthesis: Modified W -> Image
    img = G.synthesis(w_modified, noise_mode='const')

    # Conversion for visualization, only to save image
    img = (img.permute(0, 2, 3, 1) * 127.5 + 128).clamp(0, 255).to(torch.uint8)
    return PIL.Image.fromarray(img[0].cpu().numpy(), 'RGB')

# Ensure 'glasses_direction' was calculated on layers 2-3 previously
img_with_glasses = generate_with_injection(
    G=G_ema,
    seed=42,
    direction=glasses_direction,
    strength=5.0,  # Adjust intensity
    layers=[2, 3]  # Coarse/Middle layers
)

img_with_glasses.show()
Ok but what if we only generate random images? The result is even more visible here: we are basically cloning the structural layers, so a lot of traits of the reference donor are now hardcoded. Even if glasses are predominant in every image here, the geometry is locked, so the physionomy of the reference is maintained and the model loses his ability to generate unique identities for each random seed, collapsing the output into mere variations of the single donor face.

This experiment teaches us a crucial lesson about Generative AI: control requires understanding hierarchy.
We learned that StyleGAN2 organizes features semantically, from coarse geometry (pose, face shape) to fine details (lighting, texture). We saw that trying to force a structural change—like adding glasses—requires surgical precision in the early layers [2, 3]. However, as observed with the “cloning” issue, this comes with a trade-off: if we lock the geometry to ensure the glasses exist, we limit the model’s freedom to invent new face shapes.
Ultimately, StyleGAN2 is much more than a “random face generator”; it is a complex decoder of human features. By mapping the latent space W, we transform the neural network from a black box into a control panel. The true power of these models lies exactly here: not just in creating photorealistic images, but in the ability to disentangle concepts. We are no longer just rolling dice to see what happens; we are learning to become latent-space sculptors, deciding exactly which traits to keep and which to reinvent.
Cover image: Midjourney
Model graph: Sonnet 4.5 + manual editing
Code: Me + Claude Code (Sonnet 4.5)
Text: Me 🙂 (grammar corrections made with Gemini 3 Pro)


